Travel Guide of India – Indigenous Food, Ancient Caves, Ancient Temples, Archaeological Sites, Historical Places, Agricultural Crops, Heritage, Culture, Art, Architecture, Gardens, Music, Dance, Crafts, Photography, Books, Advertising and more.
Shilpa Shastra, broadly classified as the ‘Science of Arts and Crafts’ is the supreme authority on the Chatushashti Kalas (Sixty-four arts) of the universe. The subject of Shilpa Shastra is dealt with at length in the Vedas, Puranas, Agamas and others scriptures and has been assiduously adopted by kings, craftsmen and patrons of art since time immemorial. This highly scientific treatise is in simplistic terms deemed as a manual for all arts like carpentry, iconography, sculpture, architecture, jewellery etc.
Though the origin of bronze iconography found in South India is traced back to the Chola period, archaeologists have excavated idols in panchaloha (alloy of five metals) that are at least 3000 years old if not more. This suggests that this ancient craft flourished in a kingdom or kingdoms predating the Cholas but, the ‘Chola style’ is considered to be par excellence and an ingenious craft that scaled great heights during their reign.
Historical evidence says that the visionary king, Raja Raja Chola I who built the magnificent Brihadeeshwara Temple at Thanjavur (that has flummoxed architects for its gravity defying 216 feet high vimana) brought a lot of highly skilled sculptors to make idols out of metal, wood and stone to adorn the temples. These sthapatis as they are called created masterpieces in the Gangaikonda Cholapuram Temple and the Airavatesvara Temple at Darasuram dedicated to Lord Shiva that are spellbinding and considered to be nothing short of artistic genius.
As the Cholas were master builders, this craft received continuous patronage and the sthapatis were engaged in completing the temples built by the successive kings. It was during the construction of the sacrosanct Lord Swaminathanawamy Temple at Swamimalai that the sthapatis found the alluvial soil on the banks of the Cauvery River to be perfect for making moulds for bronze idols. The uniqueness of the soil is that it does not develop any cracks upon drying when used for making moulds for the wax models. This encouraged the sculptors to reside in this place and the knowledge and skill of this craft has been passed down generations. It is said that the descendants of Agora Veerapathira Sthapathy settled in Swamimalai after the construction of the temple.
As each deity created by the sthapati is generally commissioned by temples and for religious purposes, several rituals in accordance with the Hindu scriptures are performed before commencing the work. Each deity has a dhyanashloka and a spiritual and graphic description of his or her physical characteristics which will be translated into the creation. All the idols created strictly adhere to the rules laid down in the scriptures in terms of dimensions, proportions, heights and calculations.
Copper, brass and lead are used for bronze idols while copper, brass, lead, silver and gold are used to make panchaloha deities. The first stage of making the bronze icon is to make the wax model. The wax itself is prepared from a mixture of beeswax, resin from kungiliyam (Damara Orientalis) and ground nut oil.
The sthapati makes a rough outline in this mezhugu (wax) of the different parts of the body by hand. The wax is made flexible by exposing it to glowing cinders kept nearby. It is imperative to achieve completeness in the wax model as it can never be changed once it is transferred into a metal case. The quality of the final image depends largely on the experience and creativity of the sthapati.
The next step is mould making which involves coating the wax design with layers of clay. Different clay is used for each layer and the number of layers depends on the size of the icon. Alluvial soil is finely ground with charred paddy husk and mixed with cow dung and used as the first layer. This protects the wax model and the reproduction of the minute contours of the model. Generally, the wax model is laid down on paper or cloth on the floor and the coating is applied generously making sure that no portion of the wax model is left uncoated. Care is taken to see that there are no air bubbles on the surface of the first coat as it will spoil the mould cavity surface finish. The coating is applied to half the model, allowed to dry and then the remaining portion is coated. It is then dried in the shade.
The second coat is made from a paste obtained by mixing clay from the paddy fields and sand. After the application of the second coat, fine steel is wound around the entire piece before applying the third coat. The third coating is a mix of coarse sand and clay. Extra coats are applied when the icons are large in size. Special attention is given to keep the wax model intact as it serves as a vent and a runner.
When the last coat dries, one portion of the mould is ready to handle the pressure and heat of the liquid metal. This process is repeated for the remaining portion and the entire mould is complete with the wax model inside. Runners are set in wax for the metal to reach all the parts. The image is then covered with alluvial soil until it gets the desired thickness. Two small holes are made in the moulded image to drain out the molten wax and pour metal and then dried in the sun for a month.
Once the mould is sufficiently dry, it is heated over an ullai (ground furnace fired by cow dung cakes) which is essentially a deep hole dug on the floor with a vessel to collect the molten wax. The sthapati measures the wax drained out to ascertain the quantity of metal required to complete the image. This process is called madhuchishtavidhana (lost wax process) as half the wax is lost in fumes during the heating stage.
The weight of the alloy required to be poured in the hollow formed in the lost wax process is ten times the weight of the wax model. Melting of the alloy is done in a charcoal fired furnace using ceramic crucibles called kuvai. The hollow mould is heated to red heat to prevent formation of air bubbles and explosion when the liquid metal is poured.
When the desired temperature of the metal and the mould is reached, the hot metal is poured carefully into the mould that is either buried in the ground or laid on the floor. The filled mould is allowed to cool slowly. The mould portion holding the head is broken first followed by the remaining portions. Uneven surfaces are smoothened and the contours and details are finished by chiselling. Ornaments and dress details are engraved into the idol.
The entire surface is then rubbed with fine grade emery paper and polished using polishing tools. The image is cleansed in a solution of tamarind water, polished with brass polish and washed in a solution of soap nut and brushed with a wire brush. This gives a shiny finish to the surface. The pedestal is modelled in wax separately and cast and fixed at the end.
The idols are solid and the finishing is top-notch. Each piece is individually made and finished and it is highly unlikely that you will find two finished pieces similar in any aspect.
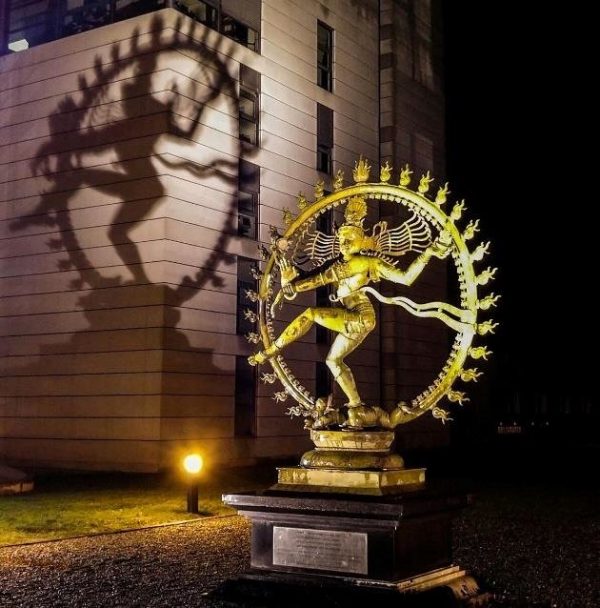
Very few people are aware that the idol of Lord Nataraja that is on permanent display in CERN Switzerland has been handcrafted in Swamimalai. This ‘Pride of Swamimalai’ was granted the Geographical Indication Tag (GI) in 2008.
Written by Lakshmi Subramanian
* Photos are only symbolic (Taken from public domain/internet and any copyright infringement is unintentional and regrettable)


Leave a comment